This is a complete Whirlpool AquaLift Self Clean Instructions Oven Guide with pictures. It also includes AquaLift oven cleaning tips for how to finish out the oven after self-clean. This is a part of our Food Equipment & Tools category.
Whirlpool® and AquaLift® are registered trademarks of the Whirlpool Corporation.
What Is AquaLift Self Clean On A Whirlpool Oven?
AquaLift Self Clean on Whirlpool Ovens is a method of using hot water to loosen residue from the oven bottom cavity. Keep reading to know more about AquaLift Cleaning.
AquaLift Self Cleaning Technology
Whirlpool’s AquaLift Self Cleaning Technology starts by pouring water in the oven’s base. It’s then heated to expedite the soaking process of baked on foods. So, the manufacturer says to protect the oven’s innovative coated surface. After the AquaLift Cleaning is done, the oven cools down gradually, while still soaking residue. When completed, wipe away the loosened residue and excess remaining water. Finally, if there are stronger buildups, one can repeat the process..

Does AquaLift Self Cleaning require any manual cleaning after it’s done?
Yes, some manual cleaning is required after the AquaLift Self Cleaning process is done. But, it has different results for everyone’s scenario. In the best cases, it’s only some mild wiping of loosened substances and the soaking up of any residual water. However, this not an extremely high temperature method that burns off baked residue into an ash.
AquaLift Self-Cleaning Oven How To Use
Here are the steps of Whirlpool AquaLift Self Clean Instructions feature. In summary, you prepare the oven with a general wiping and adding water, press the Start button, and wipe it all out when it’s done. So, read below to better understand quickly and easily how each step is done. And, for validation, here is the Whirlpool AquaLift Self Clean Instructions directly.
Step 1. Prep Oven Interior
First, you need to prepare the inside of the oven. Here are those tasks.
- Remove the oven racks.
- Wipe away any excess residue or loose particles from inside the oven, especially from its bottom.
- Add the recommended amount of water (distilled or filtered, such as from the fridge’s water dispenser).
- It’s suggested for electric ovens to use 2 cups of water. This worked well in mine.
- They suggest gas ovens to use 1¾ cups water.
- Clear off anything from the cooktop, as it sometimes gets warm whenever the oven is in use.
- Also, leave the interior oven light turned off.


Step 2. Start AquaLift Oven Cleaning
Here are your Whirlpool AquaLift Self Clean Instructions. With the oven prepared, press the <AquaLift Oven Cleaning> button, followed by the <Start> button to start the cleaning cycle. The oven light can remain on or off during this process, which lasts about 40 minutes. I leave mine off unless I want to check the progress. When it’s done, you tap the <Cancel> button, and the door unlocks.


Step 3. How to Clean Oven After Self Clean
This is how to clean the oven after the self clean cycle has finished and you’ve opened the oven door. So, here are some steps you can follow and repeat as desired.
- Ensure the oven and its leftover water has correctly cooled down for you to proceed. Also, plan on an additional 20-60 minutes, which might or might not be required in your oven. It’s not needed on mine.
- Sponge out the excess water but leave some for the manual cleaning follow-up steps.
- Use the scraper or the scrubbing side of the sponge to remove any stuck on residue from the oven’s interior bottom. Of some of, or a lot of residue remains, keep reading for the solution.
- This is also when you clean the walls, top, back, door, and glass window interiors. Use caution if cleaning around any convection fan, if you have one. Also, it’s really a good idea to clean the rack shelving slots. This will also improve the gliding action of the racks.


Step 4. Repeat If Needed
After cleaning out the oven’s interior, if you still have some baked on items, which I always do, repeat the cleaning cycle again. Then, continue reading to see what you do next if there’s still some stuck on residue after the second auto clean cycle.
Use this cleanser step at your own risk: I only perform the following added step if AquaLift doesn’t fully work after 2 cycles.
I’ve used “Bar Keeper’s Friend” or Dawn PowerWash Dish Spray as soft cleansers to assist any remaining stuck on food, but only after a 2nd cleaning cycle if needed. And, I also thoroughly rinse after using it. Whirlpool suggests only using water to avoid damage to the oven’s surface and performance. Use at your own risk. However, they sell “affresh” cleanser for cleaning the oven interior so, there’s that…


AquaLift Self-Cleaning Oven Tips
- Clean the removed oven racks while oven is self cleaning. I use Bar Keeper’s Friend soft cleanser for that. Rinse thoroughly.
- Get water from fridge’s water dispenser and microwave it to become somewhat hot for pouring into oven bottom for an AquaLift cleaning cycle.
- Get a medium-sized pan or bowl for using when you sponge out the excess water after the cleaning cycle.
- Prepare a bowl or pan of clean water, along with paper towels. Use it to help with some repeated wipes of all the interior areas you’re cleaning away the residue.

How To Cancel AquaLift Cleaning
Pressing the <Cancel> button is how you can cancel the AquaLift cleaning process. The door will unlock; however, the water might still be hot at any stage of the self clean. So, use caution and permit it to cool down before proceeding.

After AquaLift Cleaning, Oven Door is Locked
While I haven’t experienced this, if the oven door remains locked, others recommended trying tapping the <Cancel> button a few times. Another idea was to turn off the electrical breaker of the oven, waiting a short bit, and then turning back on. Anything else, it’s suggested contacting Whirlpool or an appliance repair person.
AquaLift Oven Cleaning Kit
The Whirlpool AquaLift Oven Cleaning Kit is a collection of a scrubbing sponge, a scraper, and an expanding sponge. Here are the details of the bundle.
- There are 2 distinct sides on the expanding sponge. One side is a regular soft side for wiping liquids and soft residue. The other side is a rough surface for scrubbing hard to remove substances. The sponge is non-metallic.
- Use the scraper for what the sponge can’t get up. It’s a type of hard plastic so it doesn’t damage the oven’s interior.
- The expanding sponge is for soaking up a whole lot of water. That’s for the remaining water at the end of the cleaning cycle. Its purpose is so you don’t have to perform as many repeated steps of sponging the water out of the oven’s bottom after the cleaning cycle.
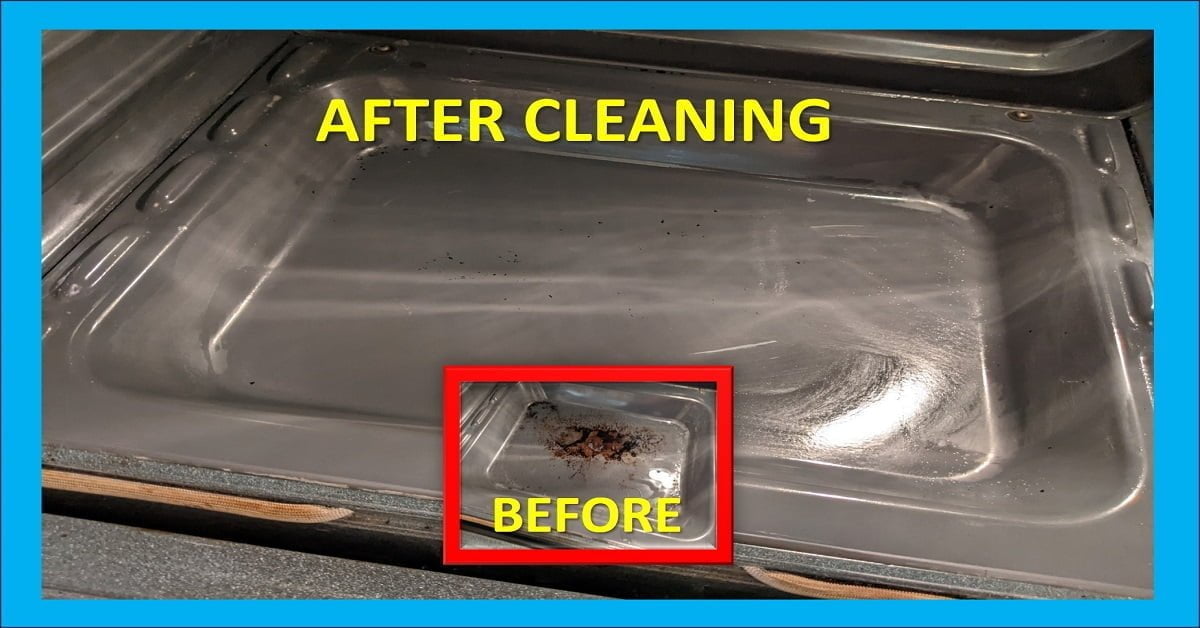
Self-Cleaning Oven Before and After
Here are pics of the Whirlpool self-cleaning oven before and after. Show is some needed manual scrubbing of remaining residue. The final, repeated cleaning also included the manual cleaning of the walls of the oven, as well as the oven’s baking racks.


Related Posts
- Selecting and Replacing Whirlpool Refrigerator Bulb
- Choosing the Best Over The Range Microwave
- How To Clean a Pizza Steel (aka Oven Baking Steel)
Conclusion of Whirlpool AquaLift Self Clean Instructions
Now you’ve seen the Whirlpool AquaLift Self Clean Instructions steps using the automatic cycle, followed by the manual cleanup. Plan on your cleaning event by ensuring you have the items needed for it. Then, set aside a couple of hours for this, in case you need 2 cycles. It’s really very easy compared to the old days of harsh chemicals. Your oven may look new again!