Knowing how to select and replace your Whirlpool Refrigerator LED Light Module cannot be overstated. Replacement takes about a comfortable 10-15 minutes. Also, this post is a part of our Food Equipment & Tools category for finding other related guides. So, for this post, we now cover these 2 important areas.
- SELECTION GUIDE for finding a compatible Whirlpool refrigerator LED light module
- REPLACEMENT GUIDE for Whirlpool fridge LED light module
When To Select and Replace Your Whirlpool Refrigerator LED Light
While it seems obvious sometimes when to select and replace your Whirlpool refrigerator bulb, there are several reasons to consider. So, here’s a list of several scenarios you might want to select and replace your Whirlpool light bulb in the fridge.
- When it’s burnt out. Duh!
- When it’s dim. There might be a partial outage of some of the LED group of lights inside one light module.
- If it flickers or strobes on and off continuously. That’s like in the old movie “Dance Fever”.
- When you open the door and it flickers to go off or on but then seems okay. If it does this more than once, replace it. However, it could also be a more serious problem internally. Also, confirm bulb is screwed in all the way or connected firmly for certain other light modules.
- When you currently use a regular screw-in appliance bulb but want to upgrade it to an LED appliance bulb.
- If it’s an LED light module and 1 or more of the LED lights have burned out.
- Finally, if you have an older model fridge and you want to consider updating it for the more current replacement Whirlpool refrigerator bulb part number.
Whirlpool Refrigerator LED Light SELECTION GUIDE
A common choice for some Whirlpool refrigerators is a popular screw-in 40-watt appliance bulb. However, there are also many models that use a longer-lasting and more energy-efficient LED light modules that use a plug-in connector. The LED lights provide a much improved extended lighting for viewing the contents of your fridge much better. Also, there are now LED screw-in bulbs as well. So, keep reading to see how to ensure you choose a compatible replacement bulb.
- Identify your Whirlpool model.
- Confirm to locate a compatible bulb.
- Purchase the replacement fridge light bulb.
Whirlpool Refrigerator LED Light SELECTION STEP 1. Identify Your Whirlpool Refrigerator Model
Before purchasing a new light bulb for your Whirlpool refrigerator, identify the fridge’s model number. This information is typically found on an inside wall of the refrigerator or in the user manual. Knowing the exact model helps you to then select which light bulbs will be compatible. Just open the refrigerator doors or large drawers and look around. It might even be in an inconspicuous place like I show here, where it’s on the underside of the upper lining.

Selection Step 1. Find your Whirlpool Refrigerator Model number.
Whirlpool Refrigerator LED Light SELECTION STEP 2. Confirm LED Light Module Part Number
Finding the best Whirlpool refrigerator LED light module involves considering performance, compatibility, and longevity. So, remove the current light to confirm a compatible type to get and possible part number. That’s assuming, of course, that the current light bulb is compatible to your fridge. Also, you might need to skip ahead to the Replacement section to see how to remove it.
Selection Step 2. Confirm or Remove LED Light Module to find Whirlpool Refrigerator part number to get.

In the meantime, here are some popular picks that cater to several Whirlpool models. I begin with the one I recently replaced.
Or Find Your LED Light Module Part Number in Your Whirlpool Refrigerator Model’s Manual
Finding the right manual for your Whirlpool refrigerator is crucial for proper maintenance and troubleshooting. Manuals often contain specific details about bulb types and replacement procedures that are essential for correctly performing tasks such as light bulb replacement. They also provide safety warnings and tips to ensure you handle your appliance correctly. This is the location on Whirlpool.com for downloading your Whirlpool Refrigerator Manuals & Docs. Just enter in your model number.
Whirlpool Refrigerator LED Light SELECTION STEP 3. Buy Your Replacement Light
Here are a variety of choices of some Whirlpool refrigerator LED lights. You, of course, need to ensure the part number of your existing bulb is actually the correct one to begin with before getting a replacement. So, assuming it is compatible, start your search for that part number. However, manufacturers frequently update parts and offer a replacement part number. So, usually it’s a good idea to go with the latest replacement part number.
The LED Light Module part says it includes cover. What does that mean?
So, when searching for the light to buy, note that some light modules will state “includes cover“. Generally, this is NOT referring to the outer protective covering in the fridge’s light. This is referring to more accurately as a “board” that mounts and holds the LED light strips. So, knowing this, be sure you’re getting not just LED light bulbs or just a strip and that it conveys the thing that has the LED lights on the assembly, aka “cover”. A good idea is to see its picture and don’t buy one that doesn’t have a pic. The first one is an example of the one I recently replaced.
Selection Step 3. Buy your selected replacement for your Whirlpool Refrigerator Bulb.
1. Original W10866538 Replaced by W11043011
The original W10866538, now replaced by W11043011, stands out for its reliability and compatibility with specific Whirlpool models. This replacement light is ideal for those seeking OEM quality. However, it’s also used in many other refrigerator brands.
This bulb is noted also for use in Whirlpool, Kenmore, Maytag, Amana, and IDEA refrigerators. It replaces Q184G2, W10866538, EAP12070396, 4533926, PS12070396, and AP6047972 with cover. Also, at the time I replaced it, the various sources were from $120 down to $15. Whirlpool parts site was charging about $120 at the time for part number W11043011. Another popular seller is PartSelect.com but they were charging about $87 for W11043011. However, a good seller is also ApplianceZone.net for part W11043011 for about $24.50. Finally, there’s Amazon and others to choose sellers from.


2. Sunlite 80218-SU LED A15 Refrigerator Light Bulb
The Sunlite 80218-SU LED A15 is a plug-in, energy-efficient choice and it caters to a wide range of refrigerators, not limited to Whirlpool.
3. Upgraded W11043014 W10805744 LED Light Bulb
The upgraded W11043014 W10805744 LED light bulb is known for its enhanced performance and compatibility with select Whirlpool models. It’s used in freezers also.
4. W11518235 W11160686 Refrigerator LED Lamp Light Bulb
The W11518235 W11160686 refrigerator LED lamp light bulb is another one for Whirlpool refrigerator owners, specific for certain models.
Whirlpool Refrigerator LED Light Module REPLACEMENT GUIDE
According to Whirlpool.com, replacing your Whirlpool refrigerator bulb is rated as a 2 out of 4 on the skills level measurement So, first start with a good idea of what you’re going to remove. Also, that means you’ve gone through the selection steps above and currently have a compatible Whirlpool refrigerator bulb ready to install.
Light REPLACEMENT STEP 1. Get Tools & Materials Ready

Replacement Step 1. You’ve finished the selection steps above. You have your replacement bulb ready to install. Now, get your tools & materials ready.
To start replacement of your Whirlpool fridge light bulb, plan out having all your tools and any materials ready to grab and use. Here’s a list of things to consider to have out.
- Have the replacement light bulb unpackaged and ready to install.
- Get a medium or medium-small Phillips and flathead screwdrivers ready to use.
- Have a good light (or LED headlamp) ready for working hands free in the dark refrigerator.
- Have a small bowl or container ready to hold screws or other related easy to lose items.
- Optionally, consider to use protective gloves, if desired, as protection from sharp edges.
Light REPLACEMENT STEP 2. Get Fridge Area Ready
Now to be really ready to work, get the refrigerator ready. You won’t want to bother with other things in your way so, look over this checklist and perform them now.
- Clear off the shelf/shelves under or around the light you’re replacing.
- Ensure any refrigerated foods are protected and placed elsewhere in the fridge, protected by ice packs, or put into a second fridge, if available.
- Remove any shelf or shelves that might be in the way of your upcoming work plan.
- Whirlpool recommends you unplug the refrigerator.
- Put on your LED headlamp or set up your work light.
Replacement Step 2. Clear off work areas in fridge. Put foods in the way into alternate cold temp areas. Remove shelves in the way. Unplug fridge (or turn off its electrical breaker). Put on headlamp or set up work light.
Safety Precautions to Follow
When replacing the light bulb in your Whirlpool refrigerator, safety should be a high priority. Begin by unplugging the fridge or turning off its circuit breaker to eliminate the risk of electrical shock. It’s also wise to wear gloves to protect your hands from sharp edges within the refrigerator compartment.
Only use bulbs compatible with your model, as this can cause damage to the refrigerator’s system. Also, ensure the area around the fridge is clear of any water to prevent slips & falls.
Light REPLACEMENT STEP 3. Remove The Outer Light Cover.
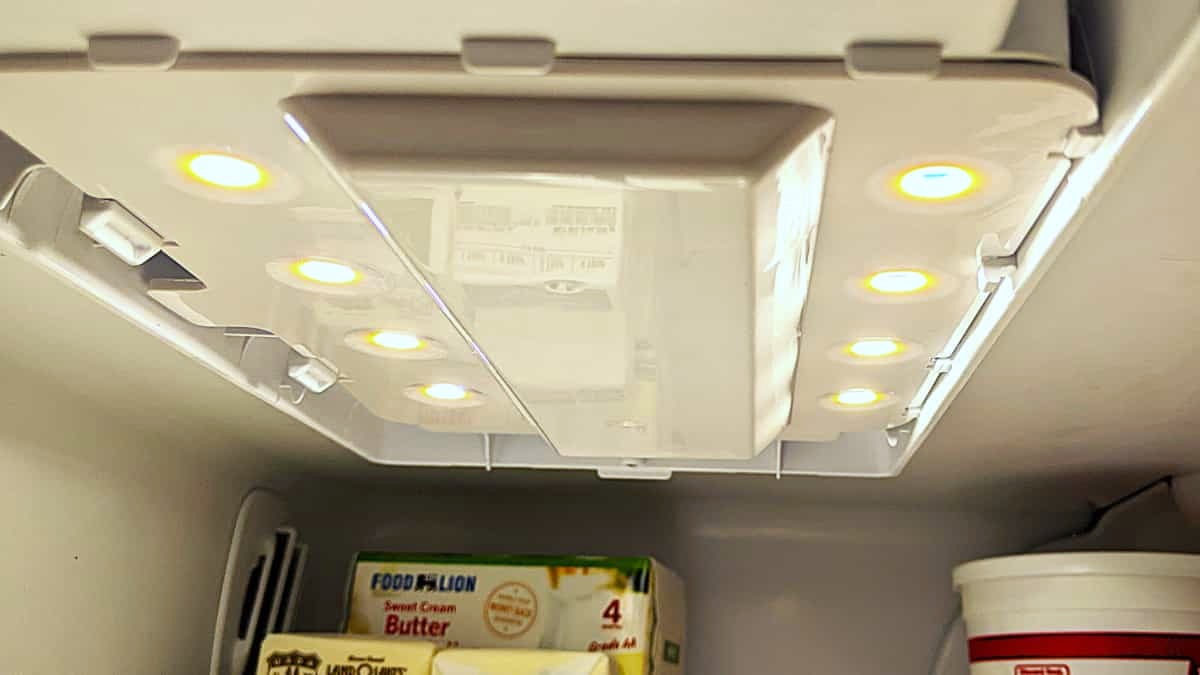
While each light removal varies, this example follows removing a popular overhead Whirlpool refrigerator LED Light Module (part number W11043011). With all fridge lights, you begin with removing any outer covering first. Some light coverings vary in their removal steps; however, here is an example.
- Remove the Phillips head screw on the rear of the LED light module outer covering. Some models might have a different type of screw head but, the Phillips screw is VERY common.
- Work the outer covering to pull it free while pulling downward. It might be stuck a bit.
- After the rear end freely pulls downward, the front end should easily slip away from its clips insert slots. Set the covering aside and put the screw in the bowl or container to avoid losing it.
Replacement Step 3. Remove the outer protective light cover in 3 steps:
1) Remove screw.
2) Work the cover to pull screw area downward to free it up.
3) When it pulls down, slip opposite end away and out of clip area.
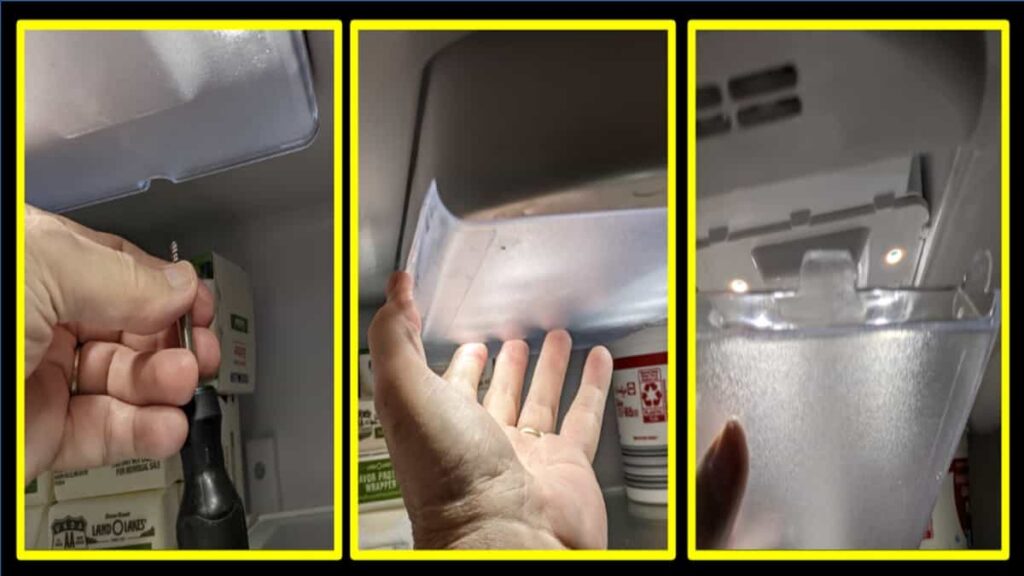
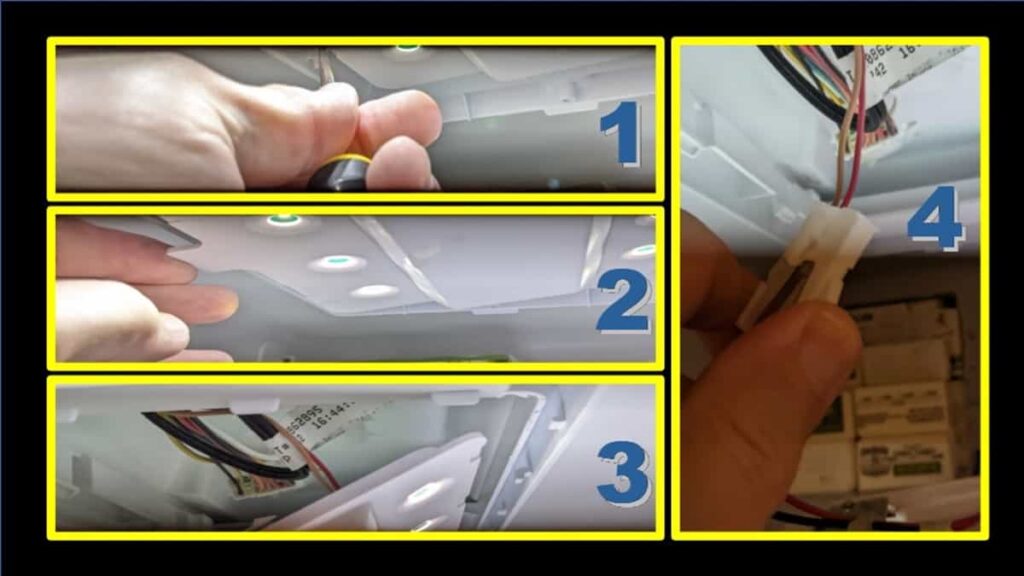
Light REPLACEMENT STEP 4. Remove Existing LED Light Module.
Now, the LED light module is exposed. Follow these steps to completely remove the light module.
- There are no screws for this removal. There are 2 tabs holding the light module in place. So, use the flathead screw driver (or your fingers) and CAREFULLY and SLOWLY unclip the back tab.
- Then, only after you can see the light module drop down enough to reveal the freed up tab, repeat with the front tab.
- Now, the left side of the light module drops down. On the right side, it can now slip out of its tiny holding supports. So, the entire module component is hanging by its connector.
- You can now unplug the electrical connector to completely remove the LED light module. You’ll probably need the flathead screwdriver to lift up a holding clip in order to separate the plug from its insertion side. Set the old light aside.
Replacement Step 4. Remove old LED light module in 4 steps:
1) Use flathead screwdriver (or finger) to release rear tab.
2) Confirm rear side of light module is free. Repeat with front tab.
3) When left side can fully drop down, slip entire module away from small support tips.
4) With entire light module hanging, unplug the light from its receiving plug and set aside.
Light REPLACEMENT STEP 5. Install the NEW Light Module and Outer Cover.
These remaining steps will now be significantly easier for installing the replacement light.
- Plugin the new Whirlpool refrigerator LED light module to the hanging electrical receiving end. This is a good time to plugin the fridge and test it to ensure it works. If it’s working, go ahead and unplug the fridge again and proceed to finish out the rest of the steps. If your original issue of the old light still exists on the new replacement light, you might have an internal issue with the fridge OR the new replacement light is bad. It’s time to consider either replacing the new light or contacting a professional technician.
- The light module goes on in the reverse order from previous removal. For example, on the right side, line it up and slip it onto its supporting small tips.
- Slowly raise up its left side and ensure it aligns fully all around. Also, ensure the plug’s wires are out of the way and won’t get caught into any of the binding framework. Then, press left side in place to snap into the 2 main tabs. Double-check that no wires are caught into the edges.
- Take the outer cover and slip it into place on its front clip inserts. Then, align it fully and press it into place and reinsert the screw fully until snugly tightened but not overly tightened.
- Plugin the fridge again and confirm the light’s working.
- If done, return the foods, shelving, etc. into the fridge’s original locations. and close the fridge stores to resume.
Conclusion of Whirlpool Refrigerator LED Lights Module
You’ve now seen how to easily select and replace a compatible Whirlpool refrigerator LED light module. You were provided easy info on how to find your fridge’s model. Also, you were provided easy, direct links to locating your model’s owners manuals. Then, you were guided on bulb removal for seeing its part number you want. Also, you were given several links to Whirlpool part suppliers of light bulbs, including Whirlpool. Overall, you were given step-by-step guides on 2 important areas: 1) Selecting the right light bulb or light module and 2) How to prep and to replace it. Now, it’s time to find your bulb using the links provided above to make it easier for you.
Related Posts
- Whirlpool Oven AquaLift Self-Cleaning Guide
- Choosing the Best Over The Range Microwave
- How To Clean a Pizza Steel (aka Oven Baking Steel)
4 comments
Regan
darngoodrecipes.com
Vernon M.
The clearness in your post is excellent and i could assume you are an expert on this subject. Thanks a million!
Stanton C.
Thank you for the auspicious writeup.
Berenice Aut
Wow amazing blog layout. You made changing out the fridge’s light module look easy. Also, the overall look of your web site is magnificent as well as the content.